Sunday, September 22, 2013

We Do Love Fish in Maine.....

and particularly Haddock!  The following is a recipe I ate in a restaurant shortly after moving to Maine in 1992.  This is so easy and so good!  You can use any white fish you might like - Cod, Haddock, Perch, Sole, Tilapia and even Salmon.  I've had friends and family from the West Coast who were delighted with this fish dish having never eaten anything so tasty.

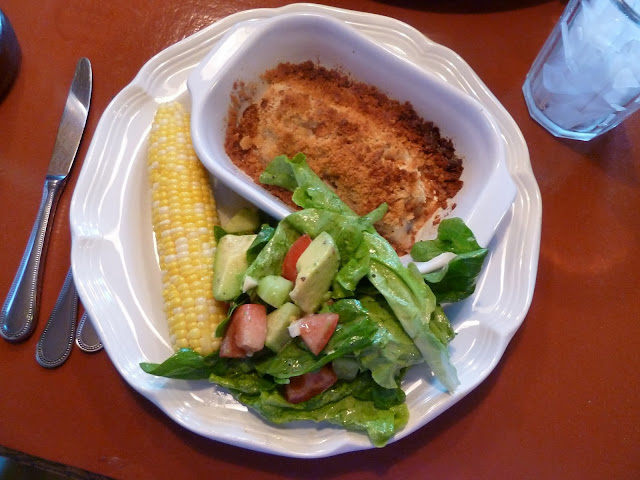
Haddock a`la Ritz

Place your fish in a dry casserole and salt and pepper.

Next....fill a baggie with Ritz crackers.  CRUSH crackers - how many crackers depends on how much fish you are trying to cover - by mushing with your hand or roll a glass over them....your choice.


Melt a stick of butter - your favorite brand.....


Pour butter over the fish - no one said this was low calorie......
Cover the fish liberally with the crushed crackers and bake at 400 degrees for 20-30 minutes depending on how thick your fish is and enjoy.


Ready to chow down - yummy!


Thursday, September 19, 2013

End of Summer Coming....

......and with it the end of veggie gardens!


 I have not been snoozing....


nor laying around on my back dreaming......(this is my Bizy Bea - not very dignified, but then when does a dog care about those things....)


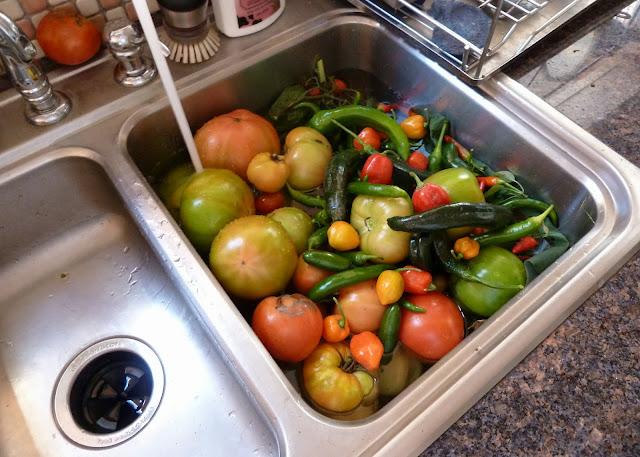
I have had sinks and sinks and sinks full of tomatoes, peppers, zucchini and some cucumbers.  Each time I load up a sink I asked myself - "what am I going to do with all of these veggies?"


This batch of tomatoes I decided to turn into Tomato Jam.
There is probably 25-30 pounds of tomatoes in this 12 quart pan ready to start cooking on the stove.


Sorry I don't have more photos of all of the ingredients I added.


Here is some of the finished product.  The following is my recipe which can vary from batch to batch and year to year.  It's one of those recipes you sort of work through by the seat of your pants.  There are a zillion recipes on the Net but here is mine.  You will have to taste as you go and you decide what you like best.  This recipe is based on this very large pot you see above.

Tomato Jam

20 lbs. diced tomatoes 
(last year I put them through the food processor which works well)
2 large diced onions
2 cups brown sugar
1 cup white sugar
1 small can tomato paste
2 jars apple jelly
this year I used apricot since I had a large 16 oz. jar in refrigerator
crush dried red pepper, to taste
2 cinnamon sticks
1/2 c. apple cider vinegar

You can add, to taste, ginger, cumin, cayenne pepper, allspice, chili powder and a host of other ingredients but the above was my formula for this year's batch.

Bring to a boil, stir to mix everything together and then reduce heat to a simmer and let cook for several hours uncovered until reduced to a thick consistency - sort of like crushed tomatoes or thicker - your choice.  Ladle into washed and sterilized jars.  Label and freeze what you can't use within a week.

This is excellent served over beef, pork, chicken and even fish.  Use it as a dip and scoop with scrambled eggs.  I spread it over cold tofu (story of making tofu below) for lunch today - I was in a hurry to get something into my stomach and get on with my task at hand.  Better than catsup any day!


I had zucchini coming out of my ears - hah, at least coming out of the garden.  We all know how prolific zucchini can be.  This year we grew the regular long variety but also one that is a cantaloupe shaped.....can't remember the name but the seeds came from Burpee's Seeds.

I've made zucchini bread until I can't find room for any more bread in my freezer.  I have blanched it and bagged for the freezer to cook in bread or whatever else I think of doing with it so what else to do with it?  Pickles!

This is a delicious "bread & butter" tasting pickle.  I used a mandolin to slice my zucchini but you can use whatever suits your tastes and needs

Zucchini Pickles

Pack tightly sliced zucchini into quart jars along with sliced onion, multiple garlic cloves and hot chili peppers.  You can also add Jalapeno peppers or other ingredients of your choice....just pack everything tightly.

Brine:
2 1/2 cups cider vinegar
1 cup sugar
2 tsp. salt
2 tsp. dry mustard seed, crush some of them
1 tsp. turmeric
2 tsp. dill (I used fresh)

Heat brine on the stove and simmer for about 3-4 minutes.  Remove from stove and let cool.  When cool pour over the zucchini.  Once cool to touch place in the refrigerator and let chill and then enjoy.


Drowning in tomatoes and green bell peppers along with a multiple of other odd peppers.  What to do with these, ugh!  Have frozen many bags of JalapeƱos, Scotch Bonnets and Banana Peppers to use throughout the winter.

I decided to clean, chop in the food processor and cook these Bell Peppers!
Sorry no photos of the cooking process.  Just imagine the same large pan above filled with chopped peppers and one large chopped onion which reduced down into these five sandwich sized bags.


I cooked the peppers until dry......very little liquid left in the pan, so keep an eye on them and stir regularly, and then ladled enough peppers into freezer bags to lay flat on the counter to about half full.  I pushed all the air out of the top part of the bag and zipped closed.  They are now stacked nice and neat in the freezer.  When you need cooked peppers for a recipe then just open a bag and snap off a chunk.


My adventures into tofu making.  This is my new tofu press from
Earth First Innovations.  Once again I don't have step-by-step photos but if anyone is interested I will post photos the next batch I make.  The tofu finished sitting in cold water on the right and below.


This is about 2 pounds of tofu sitting in its muslim wrap in cold water.
Wow, this was a lot of work but since I've worked through the process I have come up with ways to short circuit the process so next time won't be such a mess or take so long.  The other thing I did was purchase an inexpensive stock pot from Amazon.com made by T-Fal that is teflon coated.  Soy beans leave a nasty residue on EVERYTHING THEY TOUCH!  You have to wash everything almost immediately or you wind up scrubbing a lot, particularly the pan, to get this mess off!  My new pan should reduce this problem considerably.

This morning I made scrambled Tofu and eggs with tons of onion, peppers and tomatoes (have a lot of those these days, LOL) cooked along side of the eggs/tofu in the same pan for a delicious breakfast.....even my husband liked them!

Well, you have some idea of what I've been up to and until my next post I'm off to clean some more peppers and tomatoes!  Enjoy what's left of your summer because Fall and Winter is just around the corner!


Sunday, July 28, 2013

Boursin Cheese - A Tasty Treat On A Sandwich

I've been busy cooking, harvesting from the garden and baking breads for the freezer.  The other day I ran across a recipe, ploughing through some of my old cookbooks, that I had not made in years but is oh so delicious called "Boursin Cheese"!  We lived in Hanover, NH for about five years back in the 80's and one of our favorite restaurants was "Peter Christian's" which was located a block from the Dartmouth Common in the basement of a downtown commercial building.

Peter Christian's had wonderful sandwiches, soups and desserts that served the local Dartmouth community for many years.  They also had a restaurant in New London,  and Keene, NH but I guess that New London is the only location that is now still in business also having gone through a couple of owners from what I learned by reading their website.  Anyway, I acquired the only two cookbooks they put out at the time and I would guess you would have to hunt FOREVER to find a copy of either one but one of our favorite recipes was Boursin Cheese.

"Peter Christian's Recipes" by Shirley Edes and Julia Philipson, Pub. 1983
"Peter Christian's Favorites" by Shirley Edes and Julia Philipson, Pub. 1987

This is so simple but adds a wonderful taste to beef, pastrami or even chicken sandwiches.  Here it is for your enjoyment.......


Beat or blend with a fork until smooth.

8 oz. softened cream cheese
1 T. lemon juice
1/2 t. garlic powder
1/2 t. basil
1/2 t. dill
1/4 tsp. pepper
1/2 t. parsley
1/2 t. celery salt

I eliminated the celery salt because I did not have any.
I added lots of grated lemon rind and a bit more lemon juice plus chopped fine green onion tops.
Blend well, spread on your favorite sandwich and enjoy!


I think for a trip down "nostalgia lane" I might just try making some of their other recipes.  I'll let you know how they go and post if they turn out well.  

Sunday, July 7, 2013

What To Eat For Breakfast?

Okay, this heat is really starting to get to me!  I've had enough already!  It has been over 90 degrees with 75%+ humidity for a week now and I'm running on empty from perspiration!  I get up in the morning, it's sunny and maybe 80 degrees (ye-ow, already), I slept under a ceiling fan all night with only a sheet and I'm grouchy and tired and the day hasn't even begun yet!

What to eat for breakfast?  Oatmeal - have some in the refrigerator!

I love oatmeal for breakfast.  Yes, oatmeal is good any or every day of the week - well, almost everyday.  I buy it in 35 pound bags so I always have plenty of oatmeal on hand.  It fills me up, makes the plumbing work like a top and keeps me filled until afternoon and many days I can just skip lunch (I know, not a good idea) but then we'll eat early around say 4:30-5:30 and have a treat later in the evening.  I COULD NOT look at HOT oatmeal this morning.  No way, no how.  What to do?  Eat it cold I thought.  Why have I never thought about eating it cold before now?  I'm not sure, just mired in a rut for the last 40 years!!

COLD OATMEAL AND BLUEBERRIES

Here's my recipe for cooked oatmeal in a large batch, eat what I want that morning, store the rest in the refrigerator and eat off it for a couple of days.  This is a good way to get a good breakfast for the kids or yourself when short on time or energy.

Oatmeal My Way
2 cups oatmeal
3 1/2 cups water
3 pinches of Celtic sea salt

Additions:
Fruit - dried, frozen or fresh
Nuts - your choice
Yogurt or Milk

You can put any of these
ingredients in to cook (maybe not the yogurt) with
the oatmeal or sprinkle them on after you ladle
the hot oatmeal into the bowl - that's how I do it
because my husband doesn't like nuts in his oatmeal, oeh.

Place everything in a pan together, bring to a simmer and let it go for about 5-8 minutes, stir occasionally, turn off the burner, place a lid on it.  Get on with feeding the dogs and finally get back to to the oatmeal.

I like to toss slivered or sliced almonds, sunflower and flax seeds and a 1/2 cup of frozen blueberries on top of my oatmeal when it is ladled into the bowl.  If I take cold oatmeal out of the refrigerator then I put everything (nuts, seeds and fruit) in the bottom of the bowl, heap the oatmeal on top and heat in the microware for 4-5 minutes.  Another addition I like is Greek yogurt - maybe a large serving spoon amount on top after it is heated and serve.

This morning I was NOT going to eat anything HOT for breakfast!  I thought "why not cold" so that's what I did.  I had a container filled with oatmeal from the day before so I spooned out what I thought I would want, chopped it up into small bite size pieces,  dumped a good handful of nuts and seeds on the top and topped it off with frozen blueberries.  Sprinkled everything with Stevia and when it came to the table I poured on COLD milk.  IT WAS DELICIOUS, SATISFYING AND FILLING.  A nice change from HOT oatmeal.  Give it a try, you might like it and it's oh so HEALTHY!

OH, BTW, I drink iced tea for breakfast in the summer!  Picked that habit up while living in North Carolina many, many years ago but it sure makes sense when it is hot outside.  

Thursday, July 4, 2013

Happy Fourth of July and Watermelon Pico De Gallo!

"Watermelon Pico De Gallo"


Chopped watermelon chunks

1/2 watermelon cubed
1/2 red onion, chopped
1 can corn, drained and rinsed
1 bunch of Cilantro, chopped 
1 green pepper (or substitute cucumbers)
2-3 limes, juiced
1 JalapeƱo, deseeded and chopped
(if you want it spicy, then leave the seeds)
salt and pepper to taste


I will admit that this was not a recipe that I dreamed up all by myself.  I've made Pico De Gallo for decades with fresh chopped tomatoes but NEVER thought about making it using watermelon.  I was watching the Pioneer Woman with Ree Drummond one day last week, which by the way, I've become a huge fan of, and she made this Pico with the watermelon.  Wow, now that was a new idea and it just so happened that I had a watermelon in the refrigerator!  I was off and running........

Not quite red, white & blue for the 4th, more like red, green and yellow but certainly delicious!  


The recipe called for green bell peppers, besides all the rest of the ingredients listed here, but I did not have any on hand but I did have the watermelon plus these lovely small cucumbers.  I decided they would work so I quartered 3 cukes and chopped fairly small.

I then chopped 1/2 red onion, drained and rinsed a can of corn and added to the mix plus a whole bunch of chopped cilantro.  Added the juice from three limes - you might like more or less so squeeze, stir and taste.

I didn't have any fresh Jalapenos on hand either but I do keep those babies in my freezer all year long for when I might need one.  Yes, you can freeze them whole and keep in a jar or a sealed bag for many months.  I removed one from my jar, cut off the top, cut in half length-wise, removed the seeds and  chopped into fine pieces.

I added salt and pepper to taste and stirred again and tasted.  I do use sea salt and fresh ground pepper.  I grind the pepper in my small coffee grinder (see posting else where on this blog) and then add it to this glass jar with a very tight fitting lid. The pepper tastes and smells fresh for weeks in these jars (a Walmart find) so I don't have to be grinding pepper every time I need some.  The salt I use is Celtic Sea Salt which I buy in 5 pound sacks from Amazon.

I did add some chopped garlic but I wouldn't do that again - too strong but it was still very tasty.  I just think the garlic would be better left out.


Final "Watermelon Pico De Gallo" finished after it was stirred up.  I served it as a side dish, rather than a garnish, with smoked chicken breasts.  It was delicious and plenty to eat!

After posting this recipe I discovered that Ree has also posted this on her website today.  If you wish to see more photos, and most definitely better ones than mine, then go to her website at:  http://thepioneerwoman.com/cooking/2013/06/watermelon-pico-de-gallo/

Check out Ree's other great recipes while you are there!

Hope you all have a safe and fun Fourth of July!

Wednesday, July 3, 2013

Chopping Blocks & Knives


What is your favorite chopping block style and material?
Do you have a favorite brand of knife?

I have always loved wooden chopping blocks, even when "experts" have warned about germs on our boards!  I clean my board regularly as I work to prevent cross contamination, give it a good scrubbing about once a month and apply a good coat of mineral oil to protect it.  No one in my home has EVER become sick from anything I've chopped on my chopping boards!

After buying, throwing out, wearing out and going on a search for a new board a few years ago I went into sticker stock and a melt down over the cost of chopping blocks!  They were too expensive and all the wrong sizes.  As you can see from the photos I like my board LARGE and sitting right next to the sink.  I want to be able to push any mess right into the sink!  
 I was looking at an Ad from Lumber Liquidators one day and saw a large 8' x 25" cherry wood chopping blocks advertised.  The price has risen over the years since I bought mine and is now $299 but before you faint consider this - if you can find a friend, or a couple of friends to go in together then you can cut an 8 foot length into 4 chopping boards of 24" x 25" for the cost of approx. $75 dollars each!  I realize you can buy less expensive wooden boards but not out of cherry.  I made a 4 hour round trip to buy my plank and my husband did the cutting so you would have to decide whether this can work for your personal needs.

I have loved this board more than any commercially made boards I've owned over the years.  I'm mindful of its value to my every day cooking so I care for it properly and plan on it being around a long time.


 My husband added a piece at the back of my board to keep messes from falling off the back.  I'm not sure that was really necessary but he thought it was a nice touch - whatever makes the carpenter happy I say.

There are feet on the underside because I needed it to sit above the rim of the self rimming sink (which I hate but that's a conversation for another day).  Looks like the camera picked up a few crumbs I had not seen before I took the photo.  Time to lift the board and clean house!

Since this post is also about knives let me say that buying good quality knives can be VERY EXPENSIVE and if you have many of them then you will want to take the best care you possibly can of their edges.  Cutting on a wooden board will save those blades versus slicing away on granite, plastic or any other non-porous surface.  I have collected mostly Wusthof Classic knives over the years and most of them are 37 years old and still in service every single day.  I sharpen them when needed and if they really need a new sharper edge I have taken them to a professional - which has only been a couple of times over the years.

Wusthof's 8" Classic knife


  I own two of these 8" knives and at least 25 other sizes.  The 8" is my work horse knife!  I have a couple of very large 16" knives that have the wooden handles but I would not recommend those because they take special care to protect those handles - I'm not even sure the wooden handled ones are being made any more.  Use, wash, dry and store.  Do not leave a wood handled knife in water because they will get soaked and dry the handle out and ruin your knife over time.  Do not put the wooden ones in the dishwasher either.  I must admit I have put the Classics with the poly handles in the dishwasher and I've been doing it for 37 years and they are still like new but you decide if you want to risk it.   I did have a poly handled paring knife made by Henckles that I used to plop in the dishwasher regularly and the handle spit after a few years of doing that.  Not really a good practice to put any good quality knife in the dishwasher but I get lazy and sometimes do it - not with the wooden ones though - NEVER!

 I have always stored my knives in a knife block and currently own this one in cherry wood (see to left of chopping block in photo #1.  It holds 35 knives:
So love your knives and treat them with great care and they will service you for a life time.

Tuesday, June 18, 2013

Let's Talk Pantries

I have had many friends go all ga-ga over this pantry in my home.  Do I think it is special?  No, it's way too small and since I've had larger ones in previous homes, I'm not sure exactly what I was thinking when I designed this house and it was built!  I do know, I was thinking there was only going to be two of us and I did not need the large size pantries I've had in the past.  Little did I know that I was going to increase my interest in cooking, distance to the nearest grocery store was further than I liked to travel and maybe the world might spin out of control and I would have to survive off my stash for months or maybe longer......that was 22 years ago when we started the 6th house building project.  How time does change things!

 If you like to store many food products for easy one stop shopping for meals, have a large family to feed or feel you need to prepare for the unknown then think BIG, BIGGER AND BIGGEST that you can work into a home!

French doors look nice in my kitchen and go with two other glass swinging doors.  Okay, that was a good decision but not allowing more space for storage I will forever kick myself. So if you are in the house planning stage, no matter at what point in your life then think long and hard about the pantry, how you cook and what your needs are.

I am a STORAGE FREAK - always have been and so I like to have LOTS of things on hand for cooking.  On these shelves see my last discovery a year or so ago, which I really love - GLASS JARS - all the same jars filled with everything I can think to put in them, at eye level, some labeled and ready when I need them. These nice jars are sold on Amazon.com but you can also buy them at Walmart for a bit less money - around $5 each.  They hold a good couple of pounds of grains, beans, corn meal, brown sugar - which btw, stays moist in the jars for months and months with no problem - just make sure you close the lid well when you are finished.  

I also have the neatest bins that sit on the floor under the last shelf that I designed and lucky for me, my husband built for me many years ago.....what a shelf and space saver they are for canned goods.  There are lids on the top of each box to make it easier to pack the boxes to the very top and handles to pull forward for easy access.  I have 12 of them to hold various sizes of canned goods of the varieties I use the most often.

 The left side of the pantry narrows down for space because there is a fireplace that backs up to this wall in our living room.  Because of this much narrower space and because my husband used to like to drink wine with his evening meals I had this nifty wine rack built on the wall.  As you can see there isn't many bottles of wine on the rack anymore.  He doesn't drink wine all that much any longer so I use the shelves for all of those odd shaped things like dog biscuit boxes, bags, wrapping paper, long white serving plates, cast iron smoker and so on - whatever I can shove in there.

On the floor in the above photo and this one you can see large food safe bins.  Big blue one is dog kibble storage box, the rest are large quantities of rice varieties and flours which are always bought in 25-35 pound amounts.  I keep a big closet storage area with these types of bins in my basement that are filled to the top with everything from beans to oatmeal and when one of my glass jars gets empty then off to the basement to fill it up.  On the top shelf I store large items that I use infrequently like over sized roasting pans, super sized stainless steel bowls, ice cream machines and NEVER used dishes.

So if you are thinking pantry keep in mind that there is never enough space - bigger the family then the bigger the pantry should be.

Monday, June 17, 2013

I'm Back!


I’m back!  Okay, where have I been for months you ask?  Well, it’s been a trying several months what with major house repairs on the exterior of our 17 year old home, two deaths in the family, one Emergency Room visit for me, yes, I’m okay, several trips from the east coast to the west coast, husband diagnosed with a progressive brain disorder that will diminish his cognitive skills as time goes on, one ageing 15 year old dog that has to be taken outside every couple of hours or else – you know what the “else” is and who knows how many trips to the Vet!  Some days I’m not sure why I get out of bed!  I know, excuses, excuses but one gets tired and sometimes in our old age we would just rather sit in a chair, stare out the window, enjoy the silence and maybe do a little knitting.

The longer one stays away from blogging the harder it is to figure out what to say when the itch occurs to get up and going again.   I have run four blogs for several years along with many, many other activities.  Now with changes afoot in my life  I have more-or-less stopped painting (hope to get back to it eventually though) because of demands on my need to hang around closer to the daily goings on in the house.  I have at least managed to continue to cook interesting things, knit, read, surf the Net, follow politics (depressing), take photos and in general manage the ebb and flow of daily events around our corner of the world here in Maine. 

So, I guess to begin once again I will start by posting a recipe I had planned to post last December!  Better late than never as the saying goes.

Simple Cranberry Relish

 No cooking, simple, quick, except for cleaning those cranberries and is tasty!

All you need is oranges, cranberries and sugar.  Take two oranges, clean well the outsides with a soapy scrubby brush or sponge, rinse, dry and slice into quarters.  Place in food processor and whirl until nicely chopped.  Yes, you use the entire orange.


Add to food processor two packages of cranberries that have been cleaned and any nasty areas cut away.  No cooking required with this recipe.

Grind in processor until tiny bits are like a relish would look.
Add 1 cup of sugar and give a couple of pulses.
Taste and decide if it is sweet enough for you.  Add more sugar if needed.

 Ladle into clean jars and seal.  Stores in freezer until the following Christmas! That's provided you can keep from eating it all up in no time and then having to go on a hunt for more cranberries which we all know are not available until about Thanksgiving.  So taste, enjoy and make more if you like while cranberries are fresh and available.  

This is delicious on toast, as a side with turkey or chicken, slathered over many types of meats/fish and baked.  You decide and experiment with the recipe.  My whole family loves this relish better than the cooked varieties.  Enjoy!